Showing posts with label 09 Blog. Show all posts
Showing posts with label 09 Blog. Show all posts
Tuesday, 17 August 2010
New part-time prospectus is out !
Just a short note to say that the part-time prospectus is out, and features a familiar face on page 29 !

Saturday, 10 July 2010
Course Review and Closure
Again I have enjoyed another photographic course at the college, working with a good team of people, having a few laughs along the way and learning new ideas, culminating with my final grades which are shown below.
This time I have been working in the photographic studio at the Burton College, which is very different to what I am used to, working on two projects one product photography and the other portrait photography. I found both projects very interesting, and in particular with the portrait photography where I photographed the other photographers on the course, I enjoyed the challenges and I hope that sometime in the future, when some of my friends become more well known they can look back at my portraits of them.
With the receipt of my certificate for this course with the following results:
| Module | Code | Grade |
| Photography | 306 | Distinction |
| Presentation | 211 | Credit |
this closes this course.
Many thanks to Steve Davies (Mr Steve), Jim, Steve Bright, Suzy, Eric, Ruth, Rebecca, Pippa and Joe for all their support on this course.
See you on the next course !
Sunday, 4 July 2010
Patter of tiny paws
or Paws for thought
Well, after loosing our precious Becky last year, which devastated us and many people we know, and many who we did not, we visited a farm yesterday and one extra came back !
Meet Enya

Ok, she sleeps a lot !
She has been introduced to these odd shaped boxes that sometimes flash, and she will be my new model for Pet Photography, as long as she keeps them sharp puppy teeth to herself !
We will never forget our beautiful Becky xx
Wednesday, 30 June 2010
Photoshop-ed Too Far
In today’s world of digital photography, the old saying “the camera does not lie” might be true, but it is what happens after the photograph is taken that can really make a photograph tell a lie.
Whilst there are many good reasons to correct elements of a photograph, like remove a distraction, correct the levels and remove a colour cast, there are some people who take the art of digital image manipulation too far, for one reason or another.
In an article in Newsweek magazine, people complained that up to 95% of images of top celebrities have been manipulated, in some way.
In this first example, the retoucher has gone too far on the model, and this has resulted in a very long, unnatural looking, neck:

The next example is from the Los Angeles Times from March 2003
In this example, entitled Soldier in Basra, elements from two photographs were used to create one:
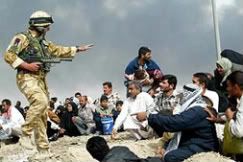
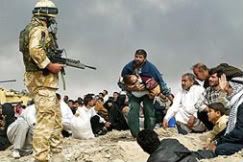
Original photos
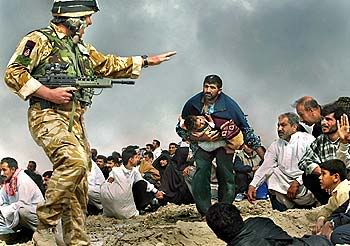
Published photo
Here the photographer Brian Walski was fired from his position at the Los Angeles Times after it was discovered that two news photographs of a gun-toting soldier had been combined to create a more intense photo. When later asked why he had digitally manipulated the photo and risked his career Brian replied: "I knew what I was doing. It looked good. It looked better than what I had, and I said 'wow.'"
Another example features Condoleezza Rice, in the USA Today website in October 2005:
 Original Photo
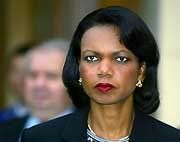
Published photo
An Associate Press photo that appeared on the USA Today website showed then Secretary of State Condoleezza Rice with unusually menacing eyes, a result of too much retouching, where the whites of the eyes have been too strongly whitened. Some questioned whether the effect had been created deliberately as it was difficult to easily replicate. The offending photo was quickly removed and replaced with a version much closer to the original and an apology from the paper's photo editor.
Finally, in the magazine photograph, do you spot something wrong (or familiar) ?

Here people from one area of the crowd have been copied and flipped horizontally, to make the crowd even larger. Closer examination may find more duplicating !
The moral of the story is to use Photoshop (or whatever program you use) carefully. Don’t mis-represent someone or something.
Always remember you can use Photoshop to make you look better on facebook, for someone to look at, but if they see you for real,
Photoshop cannot help you !
Saturday, 19 June 2010
Doing your (nested) tables
This blog is for Eric, and anyone else interested how I made the “Selecting Final Images – “ blogs, using Microsoft’s Windows Live Writer.
First of all I started with the main table:
From the toolbar, select the insert table option:

From the option box select the width as 600 (or whatever you wish) and the number of rows as 10 and columns as 2:

This created the table for the images and the reasons why I chose them, there are ten rows, two columns, but note that the “Show table border” option is not clicked. For clarity I have selected this option for this tutorial.
Once you have the table, insert and resize the image and drag the column width over to the left, to allow for the text:
-cropped%5B3%5D.jpg "Eric (_IGP8037)-cropped") |
Then, below the image add the name of the subject, and leave two line spaces below it for the table:
|
|
With the cursor on the bottom line of the left hand table cell, below the image, select ‘Insert Table’ from the tool bar again, but with these options:

With this nested table (a table within a table) you can enter the shutter speed, aperture, etc
-cropped%5B7%5D.jpg "Eric (_IGP8037)-cropped") Eric |
Now you have got the image and exposure details in the tables, you can enter the text into the right hand cell, as to why you chose that photograph.
Hope this helps.
Peter
Friday, 18 June 2010
Visiting the Exhibition
Well, visited the exhibition today and it looked very good, although I was disappointed not to see Eric’s picture on the wall (so was Eric). I saw Jim, Eric, Pippa and Steve Davies there, amongst others.
Also watched the show reel that Steve Davies had made with some of our work on, put to music, in the lecture theatre.
Then a walk around the rest of the exhibition upstairs, looking at various arty pieces of work. Very impressive.
Now to think about next year !
Revenge of iWeb
Arrhhh !!!!!!!!!!
Where is one of my most important entries !
Revenge of iWeb ?
Fortunately, I made a number of notes when I was working on the "Selecting Images - Portraits" entry of the blog, so all that suffering through iWeb did teach me something valuable !
Always make a back up !!
Just re-entering it now.
Always remember "to err is human, but to really foul things up, it takes a computer !!"
Where is one of my most important entries !
Revenge of iWeb ?
Fortunately, I made a number of notes when I was working on the "Selecting Images - Portraits" entry of the blog, so all that suffering through iWeb did teach me something valuable !
Always make a back up !!
Just re-entering it now.
Always remember "to err is human, but to really foul things up, it takes a computer !!"
Wednesday, 16 June 2010
Review of Presentation Method
Although I did like cutting the mount and mounting the images for the exhibition, and then seeing them on display, due to costs I must stick with my original idea of presenting the final images on disk and via the blog site.
This restraint is frustrating but given the current job market in Burton On Trent, this is something that I will have to accept.
The storage of printed, and mounted, images is another important consideration and for this I have too little space to safely store finished work, so again my work must be on disk only.
I did enjoy designing the cake though, but I don’t think this would be an acceptable medium for my final images !
The Exhibition
Steve Davies, our tutor, discussed with us towards the end of the course an exhibition at the college in which he wanted to include some of our work.

We selected some images each for inclusion within the exhibition, which was to be held just after we finished the course, and had the images printed at D S Colour Labs. These were then mounted during some Saturday morning sessions.
Last night, we all turned up at college to put up the exhibition, ready for the official opening on Friday 18th June 2010. Unfortunately Pippa was unable to be there, although she did plan out how some of the wall space could be used and produced a plan before hand.
Ruth, Suzy and Rebecca worked upstairs mounting some more images which were from other groups for inclusion in the exhibition:

Steve Bright and myself were attaching the fixings to the back of the prints:

Eric, Jim and Joe were arranging and fixing the prints to the wall:


Finally, most of the images were mounted and fixed in place ready for the exhibition, below are some of the prints:


Then a short moment to look at our work, both the photography and the presentation of the photographs:

Those visiting the exhibition will see Eric there all the time
(he stood next to the wall and got fixed to it !).
Finally, the portrait of a team of photographers (taken by Steve Davies):

See you all soon.
Sunday, 13 June 2010
One for Eric
Eric had a few problems with using tables with both an image and text in separate cells in a row, so I said that I would give it a go, using Windows Live Writer:
| Here is some text |  |
%20sml.jpg "Bisto For All (_IGP8172) sml") | Here is some more text |
| And some more, but this time I have added more text so that there are multiple lines of text in this cell | %5B2%5D.jpg "Linx (DSCF3160)") |
.jpg "Just Pink Saturated (DSCF3140)") | Here is another cell with plenty of text in it. |
I would like to see if this works myself !
It’s Microsoft Windows Live Writer, part of the Windows Live Suite, which includes Live Mail, Live Messenger, Live Photo Gallery and Live Video Maker, etc, available from Microsoft at http://windowslive.com/desktop/writer
Saturday, 12 June 2010
Piece of Cake
Sorry, could not resist that !
Well, after sixteen weeks work, a lot of research, quite a few grey hairs and some very good times, the course is over.
One thing I wanted to create, from my portraits that I have been taking of the group is a cake (from Asda), shown below;

Could this qualify as a portfolio ? …….. Oh crumbs
I thought that this would be a nice way to officially end the course.
I have designed cakes like this before, and I think that it is a nice, and unusual way to present something as personal as this, and to me this was the best way to mark the end of the course. My only regret is that Joe was not in when I was taking the portraits. I could not add my face to this as no one would like a piece of cake had I added it.
Besides self portraits never look good.
Eric was on hand to do the honours, making a few cutting remarks ;-)

I have got your cake for you Pippa, you are back on Tuesday so please let me know when I can get your cake to you.
Another course I have enjoyed, and it makes all the difference when you have such a good group to work with.
Hope to see some of you on Tuesday night when we are working on the exhibition. Still not used to the idea of some of my work in an exhibition !
As it was said today, it’s nice we go to the Burton Photographic Society and on some of our trips together.
Friday, 11 June 2010
Updates
I have made a number of updates to some of my work, some of which I have listed below:
| Section | Label # | Notes |
| Product Photographers | 02 | Added evaluation of images |
| Portrait Photographers | 06 | Added evaluation of images |
I hope to update other sections as well.
Digital Manipulation – Dealing with Glass
Although I have taken pictures in the photographic studio at Burton College, sometimes you feel that you would like a different or even a more exotic backdrop for your photographs.
If the subject that you are shooting is opaque, then there is not too much of a problem, but what if it is a glass bottle ?
With three of my finished images; “Quality First”, “Head and Shoulders Above the Rest” and “J2O Storm”, which were shot in the studio, I wanted to add something that would make these images stand out, but without the obvious difference in what is behind the bottle and the background.
The first step was to remove the original backgrounds from these images, by selecting the background:

then inverting the selection, contracting it slightly to remove any rough edges, adding a feather edge to help blending, then copying it to a new image.
Next create a new layer and fill this with the background that you want, remembering to place this below the subject in the layer stack.

An important point here is to label the layers accurately, because as you add more layers you can easily become confused if you leave the layer titles as Layer 1, Layer 2 …….
Once you are happy with the image, it is time to deal with the empty part of the glass bottles.
What I did was to select the clear section of each of the glass bottles, then cut it out, not copying it, and pasting the sections onto separate new layers, exactly over where they were cut from, carefully labelling each layer.
Next, on each layer I lowered the opacity to around 60%, so that the background can be seen through the layer containing the clear section of the bottle:

Below is how the tops of the bottles looked afterwards, with the coloured background visible through the glass:

Finally the before (as shot in the studio) to the finished work:

Final Images
Just managed to upload my final images, I have uploaded eleven in the portrait section and twelve in the product section just in case one is not good enough, if all are not good enough, time to panic !!!!!!!!!!!!!!
Just want to add some more in the blog if I get a chance later.
Let me know what you think.
See you all tomorrow.
Eureka
No Benny Hill style remarks please !
When I was taking the product shots of the wine glass, during product shoot 2, I based my idea on an article in Digital Photo magazine, which I then lost.
I have now found the issue, number 128 Spring 2009, and I have compared their photograph to mine:
 |  |
| Their photograph | My photograph |
Because we had limited time during the shoot, and that Jim had chose a white backdrop, we went for a contrast to what the magazine had done.
I took photographs as Steve slowly poured the ‘wine’ into the wine glass held by Pippa, waiting to get the shot that I wanted.
Some of these photographs are shown below:

Looking at the two I prefer my version, which although there was no splashing in the glass, much in the same way as Chris Collins or Martin Wonnacott, the bubbles in the ‘wine’ in the glass add to my shot. Looking at their photograph the red wine is much thicker than the ‘wine’ I used and may have been poured from a greater height to get the splashes in the glass. In their article the wine glass was fixed to a table using tape and /or blue tack, whereas in mine Pippa held the wine glass, adding the human element to the shot.
So out of the two shots, I prefer mine !
Thursday, 10 June 2010
My Photographic Kit
For reasons that I have explained to Steve Davies, the course tutor, during the course, because this presentation of our work is online and therefore available for viewing by anyone, without any form of control, I am not giving too specific details over the kit that I am using, and that I will send Steve that information direct. This is to protect someone from harassment in order to obtain equipment that they have no right to ‘borrow’.
Getting the Info
Digital cameras, when they capture an image, they imbed extra information with the image, this information contains exposure settings like shutter speed, aperture, ISO, white balance and camera information, and is referred to as EXIF data.
This information can be used to replicate a shot, if the lighting conditions are the same (this is where a lighting plan comes handy).
To view this information, all photo editors can be used, but with the implementation of Windows Vista, Microsoft also made this information readily available to anyone who right clicks on the image, and selects properties and then details:
%5B4%5D.jpg "exif data (Vista)")
Below is the EXIF settings from another photograph, shown in ACDSee:

Here I have enlarged the details for you to see better:

Sometimes you can add, using special software supplied with the camera, extra information where the photographer can add their name and any copyright details. With some cameras even GPS (Global Positioning System) information can be added.
Monday, 7 June 2010
Sunday BBQ
Good morning all
Just a quick message thanking Suzy for last nights BBQ.
I was a good night.
Back to college work now !
Thursday, 3 June 2010
New job
Well, a welcome call from Diane at Right 4 Staff has lead to me starting a new temporary job tomorrow. Fortunately, most of my work is now nearly up to date, just one more product photographer to research.
And yes I have been adding tags !
A note for Steve Bright – look at Jose Manuel Vidaurre and Martin Wonnacott, who are both product photographers, but like to involve movement in their work with drinks splashing, etc.
Friday, 28 May 2010
Burton Photographic Society Awards 2010
Just a short blog to say congratulations to my friends from this course:
- Steve Bright
- James Woodings
- Suzy Billings
- Ruth Hill
Who very well deserved their awards.
Also Steve Krneta and Alan Dawes, two friends from the previous course, who also won awards.
Congratulations
Subscribe to:
Posts (Atom)