Sunday, 4 July 2010

Patter of tiny paws

or Paws for thought

Well, after loosing our precious Becky last year, which devastated us and many people we know, and many who we did not, we visited a farm yesterday and one extra came back !


Meet Enya

Enya

Ok, she sleeps a lot !

She has been introduced to these odd shaped boxes that sometimes flash, and she will be my new model for Pet Photography, as long as she keeps them sharp puppy teeth to herself !

We will never forget our beautiful Becky xx

Wednesday, 30 June 2010

Photoshop-ed Too Far

In today’s world of digital photography, the old saying “the camera does not lie” might be true, but it is what happens after the photograph is taken that can really make a photograph tell a lie.

Whilst there are many good reasons to correct elements of a photograph, like remove a distraction, correct the levels and remove a colour cast, there are some people who take the art of digital image manipulation too far, for one reason or another.

In an article in Newsweek magazine, people complained that up to 95% of images of top celebrities have been manipulated, in some way.

In this first example, the retoucher has gone too far on the model, and this has resulted in a very long, unnatural looking, neck:

image

The next example is from the Los Angeles Times from March 2003

In this example, entitled Soldier in Basra, elements from two photographs were used to create one:
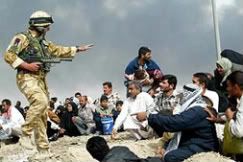
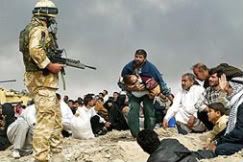
Original photos
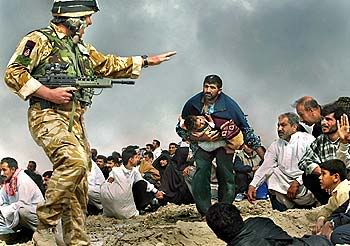


Published photo

Here the photographer Brian Walski was fired from his position at the Los Angeles Times after it was discovered that two news photographs of a gun-toting soldier had been combined to create a more intense photo. When later asked why he had digitally manipulated the photo and risked his career Brian replied: "I knew what I was doing. It looked good. It looked better than what I had, and I said 'wow.'"

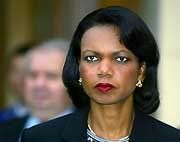
Another example features Condoleezza Rice, in the USA Today website in October 2005:

Original Photo

Published photo

An Associate Press photo that appeared on the USA Today website showed then Secretary of State Condoleezza Rice with unusually menacing eyes, a result of too much retouching, where the whites of the eyes have been too strongly whitened. Some questioned whether the effect had been created deliberately as it was difficult to easily replicate. The offending photo was quickly removed and replaced with a version much closer to the original and an apology from the paper's photo editor.

Finally, in the magazine photograph, do you spot something wrong (or familiar) ?

Here people from one area of the crowd have been copied and flipped horizontally, to make the crowd even larger. Closer examination may find more duplicating !

The moral of the story is to use Photoshop (or whatever program you use) carefully. Don’t mis-represent someone or something.

Always remember you can use Photoshop to make you look better on facebook, for someone to look at, but if they see you for real,

Photoshop cannot help you !

Saturday, 19 June 2010

Doing your (nested) tables

This blog is for Eric, and anyone else interested how I made the “Selecting Final Images – “ blogs, using Microsoft’s Windows Live Writer.

First of all I started with the main table:

From the toolbar, select the insert table option:

Insert table

From the option box select the width as 600 (or whatever you wish) and the number of rows as 10 and columns as 2:

 main table

This created the table for the images and the reasons why I chose them, there are ten rows, two columns, but note that the “Show table border” option is not clicked.  For clarity I have selected this option for this tutorial.

Once you have the table, insert and resize the image and drag the column width over to the left, to allow for the text:

Eric (_IGP8037)-cropped  

Then, below the image add the name of the subject, and leave two line spaces below it for the table:

Eric (_IGP8037)-cropped

Eric


With the cursor on the bottom line of the left hand table cell, below the image, select ‘Insert Table’ from the tool bar again, but with these options:

Nested Table

With this nested table (a table within a table) you can enter the shutter speed, aperture, etc

Eric (_IGP8037)-cropped

Eric


Now you have got the image and exposure details in the tables, you can enter the text into the right hand cell, as to why you chose that photograph.

Hope this helps.


Peter

Friday, 18 June 2010

Visiting the Exhibition

Well, visited the exhibition today and it looked very good, although I was disappointed not to see Eric’s picture on the wall (so was Eric).  I saw Jim, Eric, Pippa and Steve Davies there, amongst others.

Also watched the show reel that Steve Davies had made with some of our work on, put to music, in the lecture theatre.

Then a walk around the rest of the exhibition upstairs, looking at various arty pieces of work.  Very impressive.

Now to think about next year !

Revenge of iWeb

Arrhhh !!!!!!!!!!

Where is one of my most important entries !

Revenge of iWeb ?

Fortunately, I made a number of notes when I was working on the "Selecting Images - Portraits" entry of the blog, so all that suffering through iWeb did teach me something valuable !

Always make a back up !!

Just re-entering it now
.

Always remember "to err is human, but to really foul things up, it takes a computer !!"

Wednesday, 16 June 2010

Review of Presentation Method

Although I did like cutting the mount and mounting the images for the exhibition, and then seeing them on display, due to costs I must stick with my original idea of presenting the final images on disk and via the blog site.

This restraint is frustrating but given the current job market in Burton On Trent, this is something that I will have to accept.

The storage of printed, and mounted, images is another important consideration and for this I have too little space to safely store finished work, so again my work must be on disk only.

I did enjoy designing the cake though, but I don’t think this would be an acceptable medium for my final images !

The Exhibition

Steve Davies, our tutor, discussed with us towards the end of the course an exhibition at the college in which he wanted to include some of our work.

Poster

We selected some images each for inclusion within the exhibition, which was to be held just after we finished the course, and had the images printed at D S Colour Labs.  These were then mounted during some Saturday morning sessions.

Last night, we all turned up at college to put up the exhibition, ready for the official opening on Friday 18th June 2010.  Unfortunately Pippa was unable to be there, although she did plan out how some of the wall space could be used and produced a plan before hand.

Ruth, Suzy and Rebecca worked upstairs mounting some more images which were from other groups for inclusion in the exhibition:

Ruth mounting images

Steve Bright and myself were attaching the fixings to the back of the prints:

Steve fixing

Eric, Jim and Joe were arranging and fixing the prints to the wall:

Eric and Jim

teamwork

Finally, most of the images were mounted and fixed in place ready for the exhibition, below are some of the prints:

Left Wall

 Right Wall

Then a short moment to look at our work, both the photography and the presentation of the photographs:

Eric  

Those visiting the exhibition will see Eric there all the time

(he stood next to the wall and got fixed to it !).


Finally, the portrait of a team of photographers (taken by Steve Davies):

The Team

See you all soon.